Sunday, October 30, 2011

Deutscher Schokoladenbrauner Kuchen

Hallo!!

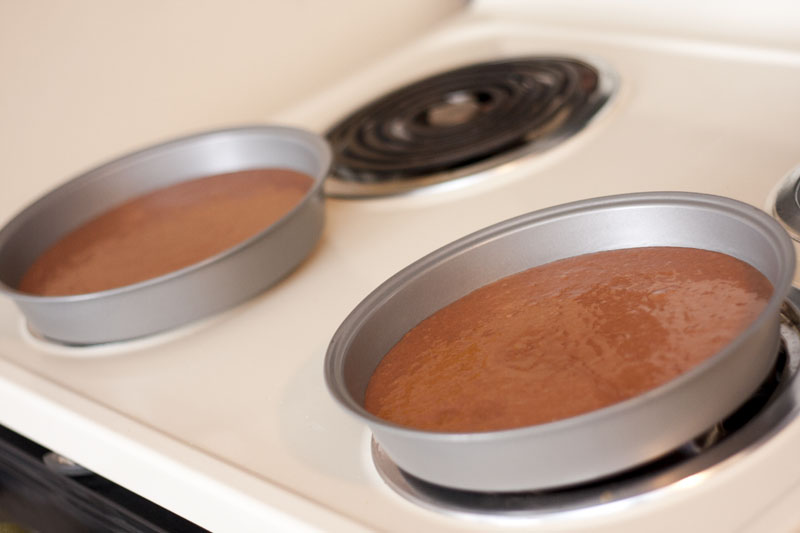
German chocolate cake!!! I had some eggs that I needed to use up and decided to try my hand at making a cake. My friend had left their cake pans here so I commandeered them! It was just a Betty Crocker box cake and frosting so I figured I couldn't mess it up too bad and set to work. I just followed the instructions on the box and waited for it to finish baking. What I didn't anticipate for is getting the cake out of the pan...I've never done that and had no idea how to do it without ruining the cake. So I just shook it a bit until the cake loosened itself and all was good in the world of cake again :) Also, what Betty Crocker doesn't tell you is how much frosting you need. I used two 9" cake pans and only bought one thing of frosting and that would have been fine if I didn't want to frost the sides of the cake, so I had to run to the store and buy a second can to finish the job. As far as I can tell everything turned out just fine, but I'll know tomorrow when I take it to my dad's house for the true taste test :)


Friday, October 28, 2011

Earth Worm Pie

2 Oreo Cookie pie crusts
5.9oz package chocolate pudding
Gummy worms

Take one of the pie crusts and crush it up, you can also do this with regular Oreo cookies, but i didn't want the temptation of a package of Oreos around :) Put a few gummy worms in the bottom of the other pie crust. Make the pudding according to the package then pour in pie crust with the gummy worms. Sprinkle the crumbled one on top of the pudding to make a top crust and then push a few worms into it to make it look like they're crawling around in dirt.

This was seriously one of the easiest things I've created!! I didn't follow a recipe, I just knew what it looked like and winged it. I ran into my friend Amy at the store suggested using two Oreo pie crusts and crumbling one rather than actual Oreos, which was probably better because I don't have a chopper and I think the filling would just make things weird. The crust is just the cookie part so it crumbles really easily and looks perfect!! I was stressing out about what to make for my friend's Halloween party, I wanted something festive, but not too gross looking at the same time so this was perfect! I'm really happy with how it came out and I had a little left over so I made a mini one that I could try after dinner so I knew how it would taste before tomorrow. It was tasty!! I adore gummy worms though so that might be why lol.


Wednesday, October 26, 2011

Pumped Up Pumpkin Seeds

1 1/2 cups raw whole pumpkin seeds
2 teaspoons butter, melted
1 pinch salt

Preheat oven to 300 degrees F (150 degrees C). Toss seeds in a bowl with the melted butter and salt. Spread the seeds in a single layer on a baking sheet and bake for about 45 minutes or until golden brown; stir occasionally.

Halloween is my absolute FAVORITE holiday (then Easter, then St. Patty's Day...weird I know) so I was really looking forward to carving pumpkins as I do every year. But since I moved out on my own seven years ago I haven't had roasted pumpkin seeds. My mom would make them every year while my sister and I carved our pumpkins, so I was determined to learn how to do it. After putting in the Google search I found out that it was like the easiest thing ever to make so I was pumped! Then I saw different reviews of recipes talking about using different spices other than just regular salt. There was cayenne pepper, Lowry's seasoned salt, cinnamon sugar...everything!! So I decided that butter garlic pumpkin seeds were the best thing since sliced bread and THAT is what I was going to make!!

In one of the reviews someone had said that it was best to let the seeds dry out over night rather than roasting them straight out of the pumpkin, so I spread them out on a cookie sheet (in a single layer) and left them there. I was really hopping for pumpkin seeds last night, but I am SO glad that I waited for them to dry...I'll talk about why later.

First off, I had 2 cups of pumpkin seeds so I upped the butter to 3 teaspoons and instead of a "pinch" of salt I added 1/4 teaspoon of garlic salt and melted them together in the microwave. Then I added the seeds to the butter garlic and mixed them all around until they were all covered in goodness. Once again I spread them out evenly on the cookie sheet (in a single layer) and popped them in the oven. Another one of the reviews said to mix them every ten minutes, I did about halfway through and that was it and they came out just fine. So going back to why you should let them dry overnight; the seeds roast up better and are extra crispy :) When my mom made them, they kind of had a bitter taste probably from being so fresh, but I think this way is a lot better. Sorry mom!! I have one more pumpkin left...I'm going to try taco pumpkin seeds next!!!


Tuesday, October 25, 2011

Miss Quesadilla Mae Hurt

1 package of 10" tortillas
2 precooked grilled chicken packages
2 cup package of Mexican style shredded cheese
24 oz. jar of salsa
1 packet of taco seasoning mix

The recipe: (10–15 minutes) Heat a frying pan on the stove. Combine chicken, cheese, salsa and a 1/4 of the taco seasoning in a bowl. Place one tortilla in the frying pan, add the mixture to half of the tortilla, fold over and cook until tortilla is browned and filling is warm. Flip to brown both sides.

*Optional* Serve with sour cream and jalapenos, or however preferred.

I don't like pretty much anything that's spicy so this is the recipe for quesadillas the way I like it, but if you like to sweat like a stuffed hog while you're eating feel free to add whatever spicy shenanigans you want. That's why it's called "Miss Quesadilla Mae Hurt." That and it's part of my derby name. Awhile back we were going to come up with a team cookbook and each of us had to contribute a recipe, this was mine.

Now the first time I made this it was very close to be a disaster. I decided that I was going to make a giant quesadilla (don't ask questions, I don't know what I was thinking, especially since I worked at Taco Bell for two years you'd think I'd know). Anyway I wanted a giant one and put one tortilla down, covered all of it with the inside mixture and then laid another tortilla on top. All was fine and dandy until it came time to flip the thing. I have enough trouble flipping the one that's folded in half let alone the giant one with no side to hold the stuff in. Needless-to-say all the chicken and melty cheese fell out because one tortilla folded over and then I had to wash the pan just to cook a new one. Epic fail. And like I said earlier, what the heck was I thinking?!

All is good now, I have perfected the art of quesadilla making. I've fed it to three friends, none of which have died or gotten ungodly sick so I think I'm good :) This can very easily be made into a vegetarian friendly by using mushrooms or refried beans. 


Tuesday, October 11, 2011

Cake in a Cup


Ingredients
4 tablespoons self-rising flour
4 tablespoons sugar
1 egg
3 tablespoons cocoa powder
3 tablespoons Nutella
3 tablespoons milk
3 tablespoons vegetable oil
Whipped Cream Topping (if desired)
½ cup heavy cream
1 tablespoon sugar
Directions
Combine all ingredients in a large coffee mug. Whisk well with a fork until smooth. Microwave on high for 1½– 3 minutes. (Time depends on microwave; mine took 1½ minutes.)
Add heavy cream to the bowl of a stand mixer fitted with a whisk attachment and whip on medium-high speed until almost stiff. Add sugar and beat until heavy cream forms stiff peaks. Top Mug Cakes with whipped cream and a little chocolate sauce, if desired.

The Cake in a Cup is probably one of the most ingenious inventions I've ever had the privileged of eating. It was so yummy and perfect to tame the I need cake right now! craving that comes on every now and then. Plus, I didn't have to buy an entire cake and then have the burden of not only eating it all, but also thinking about all the calories I just ate lol. So this is a great alternative.

Now because I'm full of all kinds of talent, I managed to get egg on my pants while trying to crack the stupid thing. Everything went off without a hitch other than that, but as you see, the directions say to cook it for 1½– 3 minutes, but my microwave must cook cold or whatever so I had to cook it for about 4 minutes. I took it out and was eating it the first time and got down to the bottom and it wasn't quite cooked all the way through, so I just popped it back in the microwave and finished. I think if I had known that it wasn't cooked all the way, the puff on the top wouldn't have fallen down (check out the pic). It probably would have been like a mushroom ballooning out of the top of the cup, but it's all good and everything tasted great and that's all that matters.


I also didn't make the whip cream to put on top, just because I thought it would be a little much to have at one setting between that and dinner. I didn't even finish the entire cake as it is, so I'm sure with that I would be exploding with food lol.

Mini Deep Dish Pizza

3-4 whole wheat wraps (try to find ones with at least 3 grams of fiber or more per wrap)
1 (15oz) can pizza sauce (you may have some left over, depending on how much sauce you like)
3/4 cup shredded mozzarella cheese
1/4 cup parmesan cheese
48 mini turkey pepperonis (or the 12 whole turkey pepperoni’s, each cut into 4 even pieces)
1 tsp basil/oregano mix OR Italian seasoning
1/2 tsp garlic powder
pinch of sweetener, (sugar/stevia/splenda)

pinch of black pepper
*Put your own spin on these by adding anything that you would normally like on a pizza just before popping them in the oven!

1. Preheat oven to 425 degrees. Spray a 12 count muffin tin with non-stick cooking spray.
2. Start by laying each tortilla out individually on a flat surface, and use an empty can, cup, or cookie cutter to cut 3-4 medium circles out of each wrap. I used the empty pizza sauce can, which worked well!3. Press each wrap circle into muffin tin using your fingers. Note: it doesn’t have to cover the entire side of the tin, it should just fit snuggly!
4. Meanwhile, pour pizza sauce into a medium sized bowl….Add in the parmesan cheese…And the spices. Stir until everything is well combined.
5. Drop about 1-2 tbs of sauce in each wrap, this really varies according to how much sauce you like!
6. Divide mozzarella cheese evenly over each mini pizza.
7. Place 4 mini pepperoni’s on top of each pizza.
8. Bake in preheated oven for 12-15 minutes, or until cheese is melted and lightly browned.
9. Wait for pizzas to cool, and remove from muffin tin using a fork or knife. Pizza’s should pop out with ease!
Calories: 66 Calories Per Pizza
Weight Watchers Points Plus: 3pp for 2 Pizzas, and 5pp for 3 Pizzas
Servings: 12 Mini Deep Dish Pizzas


These were so quick and easy to make. I was done with the prep right as the oven was finished warming up. I didn't actually pay too much attention to the recipe since I didn't actually need to eat 12 of them. I only made three so I didn't mix the ingredients together or any thing like that. I just cut out the circles from the wraps, put in a tablespoon of pizza sauce in each one , sprinkled a little bit of each spice and parm, then put in three of the normal sized pepperoni (I didn't use turkey one's either), and put the cheese on top. Next time I'll probably use a little more pizza sauce and more mozzarella to fill them up a bit more, but other than that they were perfect. I also didn't spray the muffin pan because I don't have any spray, but I ended up not needing to either. I had to buy a muffin pan because I didn't have one of those either, but I bought the non-stick pan so I figured I was safe. Also, twelve minutes was a tad too long to cook mine. I checked them at ten minutes and they were a little on the dark side, but nothing that I couldn't handle. If I hadn't plan on making dessert as well tonight I probably would have made more than three pizzas for myself, but I wanted to have room to at least try both things. They were really yummy and SO easy to make. These are great for quick dinner, and between these and my Cake in a Cup, I am way full!! I actually think I'm going to make these tomorrow before I head out to go to school.

Sunday, October 9, 2011

VoilĂ !

So here the finished product of chili, complete with Texas Toast. The recipe made SO much chili, and I tried to get people to come over to help me eat it, but I only had one taker so I froze the rest. But they liked it, must be a sign I'm doing something right lol. I think the rest of my friends might be too scared at my recent uptake in cooking and they're waiting until I have a little more experience under my belt hahahah. Can't say I don't blame them!

I am honestly impressed because it turned out really well. I didn't know how much I'd like it because of all the beans, I'm not that big of a fan of them, but it was tasty. I never thought that chili without meat would be so yummy. Just goes to show that you've got to try something new sometimes.

I really don't think I'd do anything different the next time. I did notice after the last post it said to "season to taste" and I just added all the seasons at the full amount the recipe called for, but it was delicious anyway, so it worked out. I will definitely be making this again during the winter!

Hopefully you'll try this chili!
~The Terrible House Wife

Saturday, October 8, 2011

Me vs. Onions: Round 1

1 (19 ounce) can black bean soup
1 (15 ounce) can kidney beans, rinsed and drained
1 (15 ounce) can garbanzo beans, rinsed and drained
1 (16 ounce) can vegetarian baked beans
1 (14.5 ounce) can chopped tomatoes in puree
1 (15 ounce) can whole kernel corn, drained
1 onion, chopped
1 green bell pepper, chopped
2 stalks celery, chopped
2 cloves garlic, chopped
1 tablespoon chili powder, or to taste
1 tablespoon dried parsley
1 tablespoon dried oregano
1 tablespoon dried basil

Directions 
In a slow cooker, combine black bean soup, kidney beans, garbanzo beans, baked beans, tomatoes, corn, onion, bell pepper and celery. Season with garlic, chili powder, parsley, oregano, and basil. Cook for at least two hours on High.

Let me just say that I am NEVER chopping onions again!!! End of story. It took me f-o-r-e-v-e-r to finish chopping because my eyes burned SO bad. How do people do that? How do chefs do that on a daily basis?! Them people are nuts. There's got to be a trick to it, but I sure don't know it! It's been like 3 hours and my eyes are still sensitive. >.<

I was a little nervous that my Crock Pot wouldn't be big enough because I don't know the size of it and the recipe says it's for 8 servings. I was going to cut it in half, but I didn't know what I was going to do with the half cans of food, so I just crossed my fingers and threw it all in. Thankfully it all fit.

I'm also not cooking it on High because it's for tomorrow's dinner, so I have it on Low. I don't really know how long I should let it cook though...I thought about shutting it off and putting it in the fridge for the night, but I don't really know. Guess I'll wing it lol.


Not So Chicken Alfredo


½ of a 1 pound package fettuccine
1 cup fresh or frozen broccoli flowerets
2 Tablespoons butter
1 lb. skinless, boneless chicken breast, cut into 1 ½-inch pieces
1 can (10 ¾ ounces) condensed cream of mushroom soup
½ cup milk
½ cup grated Parmesan cheese
¼ teaspoon ground black pepper
Directions:
1. Prepare the fettuccine according to the package directions in a 3-quart saucepan. Add the broccoli during the last 4 minutes of cooking.
2. Drain the linguine mixture well in a colander.
3. Heat the butter in a 10-inch skillet over medium-high heat.
4. Add the chicken and cook until it's well browned, stirring often.
5. Stir the soup, milk, cheese, black pepper and linguine mixture in the skillet.
6. Cook until the mixture is hot and bubbling, stirring occasionally. Serve with additional Parmesan cheese.
7. Serve with warm buttered brown and serve dinner rolls.

I called it a "Not So Chicken Alfredo" because I left the chicken out all together. It's not that I'm a vegetarian, although I should be with as much as I love animals, it's that I'm too big of a baby to touch raw meat. It just grosses me out beyond belief, so I just don't do it. I tried to feed my dogs a RAW diet for a couple months and I had to use gloves just to do it, then afterward I'd scrub down like I was going into surgery...EW GROSS! Anyway, since I didn't do chicken, I just added 2 cups of broccoli instead of one and took out step 4 all together.

So this probably would have worked out a bit better had I remembered to add the soup in with step 5. I had gotten all done and had it on my plate, looked over and there was the stupid can of Cream of Mushroom soup on my table. *facepalm* So I just dumped everything back into the saucepan and added the soup, turned the stove on medium and stirred it in really well. I didn't look as pretty as the picture, but it still tasted great...for the most part. I JUST realized it says "¼ teaspoon ground black pepper"...I definitely put in a whole teaspoon of the stuff. I thought that it was really peppery. I swear I'm a genius. NOT! Now I feel like an idiot, oh well, live and learn.

I also didn't use fettuccine noodles either, purely for the fact that I like the way the Rigatoni noodles look. Plus I already had some at home and didn't feel like spending any more money at the grocery store than I already was. And lastly, Texas Toast sounded better than dinner rolls so I went that route, but I didn't do my own; I bought the frozen, make-in-five-minutes ones.

Friday, October 7, 2011

Pizza in a Blanket


Crescent Rolls
Pepperoni
String Cheese
Ranch/Marinara Sauce

(You can make as many or as few as you like.)

Separate the crescent rolls into triangles. Place 4-5 pepperonis on each triangle and top with half a string cheese. Roll up and bring up sides to seal.

Bake according to directions on crescent roll package.

Original recipe can be found here.

First, I don't like ranch nor marinara on my pizza so I left that part out. But I am particular to flavored crust so I bought the "Buttery Flaky" crescent rolls and sprinkled some garlic salt on top of them before popping them in the oven. The total prep time was less than 10 minutes and that's with me being a complete idiot when I comes to opening tubes of rolls. My baking time was only 13 minutes, so these would be great to grab as a quick snack. They're delicious, but they are a little dry, so I think the next time I'll probably add just a little bit of pizza sauce to it before I roll it.


I would call this one a success! I had no disasters happen, no giant messes to clean up and they're perfectly done. I'm pretty sure it's a miracle lol.


New Toys


I went to the resale shop today looking for a decent couch, but look at what I found instead!! Yesterday, I discovered a recipe for some potato soup that required a Crock Pot, but I didn't own one so I figured it would be a minute before I could make it, not to mention the heat wave we have going on right now, soup is the LAST thing I want to eat in the 75F weather. But it was only $5! How could I pass that up? Plus it's all cute and little, just enough for me and any extra I have I can freeze for later :)

Then I found that set of cups and they were only $2 for all of them. I looked around for the plates and bowls, but no such luck. Either way, they're awesome.

Off to make dinner...Pizza's in a Blanket...nom nom nom. *Fingers crossed* for me!

Thursday, October 6, 2011

Pretzel Jell-O


2 1/2 cup crushed pretzel
3 Tbsp. sugar
3/4 cup butter (oleo or margarine will work as well)

1 (8oz) pkg. cream cheese
1 cup sugar
1 (8oz) container Cool Whip
1 (6oz) pkg Strawberry Jello-O
2 cup boiling water
1 (16oz) pkg frozen strawberries (sliced if you can find them)

Combine crushed pretzels w/ sugar and melted butter. Press into 9x13 inch pan. Bake at 350 for 10 minutes. Remove from oven and cool COMPLETELY (very important!)

Blend cream cheese, sugar, and Cool Whip together. Spread on top of crust. Combine water with jello until dissolved. Add frozen strawberries and stir until almost set. Pour mixture
 over cream cheese and put in refrigerator until set (overnight).

Let me start out by saying that this is my very first attempt at making a dessert that isn't a s'more, so I knew from the get go that this was going to be interesting. I wrote down all the things I needed to buy, which included measuring utensils and a whisk, since I didn't have either of those things, and headed out to the store. I have to say that I had anticipated spending a LOT more than I did, but I got out of there paying EXACTLY $14!! That's the ingredients and utensils (I didn't even have sugar...that's the fun part about starting completely new in a house, you've got nothing).
As you can see the recipe calls for a 9x13 inch pan. I don't have one of those and figured I could use my pie dish, but I haven't learned how to split a recipe yet (math, also not one of my strong points) so I just made the whole thing. I definitely had some left over and had a little Pyrex dish and just made a small size, big enough for two people as well. Now there are a couple things that I would have done different. First of all as you can see by the two photos below the top one is the one I made in the pie pan and the second one is the one I made in the smaller dish. The next time I make this I will use a Glass Footed Trifle Bowl because I had an issue with the Jell-O spilling over the edge in the pie dish. Also when it spilled over, it leaked into the pretzel layer and they got a tad soggy. But with the taller bowl you can make it in layers so the whip cream/cream cheese/sugar layer will act as a seal against the Jell-O.
The other thing I'd do differently is buy a had mixer and a chopper. Crushing up the pretzels by hand took forever and would have been much better with one of those chopper things. But I think the hardest part of the prep was mixing the whip cream layer with a whisk. It ended up being a tad lumpy. A friend of mine let me whip the left-overs in her mixer and it helped tremendously, so that's definitely an investment I need to make in the future. Other than those two issues everything else was good and it tasted awesome too!! 


Recipe from my derby friend: Jenn O. Cide

What?! You Can't Cook?!

Well, I've decided to start a third blog (I also have my photography business's blog and a travel blog) so I can document my learning process as I attempt to cook. I never had ANY interest in all the girly things like cooking and cleaning and whatnot when I was younger. My parents tried to get me to help them cook so I could learn. But to this day I can't even make a grilled cheese without having it be a complete disaster! But recently I left my ex-fiance and am out on my own...trying to figure out how to not be a complete failure at being a woman. I did learn how to clean a LONG time ago because my parents just wouldn't stand for the house being a disaster (which I don't blame them), but they gave up on me cooking cause I put up such a fight. Matter of fact, when I was a kid I swore up and down that I was going to grow up and marry a chef so I didn't have to do any cooking. Well, my ex wasn't a chef and I'm not married. So I guess the cooking's up to me! An old dog can learn new tricks, so I'll be posting my attempts at cooking (don't laugh cause it might get a little hairy at times). And what I'd do differently the next time I make that recipe.

Hopefully you find this somewhat amusing as well as informative.
~The Terrible House Wife